>Aunt Trisha’s Smashed Potatoes

>These are truly a treat.  I am not sure where my Aunt Trisha got the recipe from, or if she devised these herself, but they are a keeper!

You will need time when you make this recipe… allow for an hour or so.

Ingredients:
Yukon gold baby potatoes (or baby potatoes of other sorts, I know fingerlings also work well)
Coarse salt
Olive oil (Aunt Trisha uses peanut or canola oil because they have a higher burning point than olive oil, but I used plain old olive oil and they turned out fine)

Preparation:

1. Scrub clean baby potatoes, submerge in pot of water and heat over medium/high flame.  Basically, what you’re doing in this step is boiling the potatoes until they’re fork tender.  I didn’t time how long it took mine to get tender — I just kept checking.  My guess is something like 10 minutes?

2. Once they’re tender, remove the potatoes from water.  Place the potatoes on a sheet pan and let them cool slightly. (I lined my sheet pan with parchment paper, since I didn’t want a messy clean-up, and this only sorta worked for me…I still had to clean the baking sheet, but I guess it could have been worse.)

3. Once the potatoes are slightly cool, carve an X on the tops of each potato, slicing them about 1/2″ deep.  Then, with your fingers (or I guess my Aunt Trisha uses a spoon, probably to keep her fingers from burning on the hot potatoes), smash/pinch the potatoes together, so that the potatoes open up a little (see the picture above, difficult to explain in words).

4. Drizzle oil over the potatoes, making sure to put enough on so that the potatoes will get crispy, but not too much to drown them.  Then sprinkle coarse salt over the potatoes and place in an oven heated to 425 degrees for 45 or so minutes.

The potatoes will come out soft, but crunchy!  Like a mixture between french fries and baked potatoes!

Posted in aunt trisha, potatoes, recipe, side dish, smashed | 1 Comment

>Flank Steak with Parsley-Garlic Sauce

>This is a truly tasty recipe that I’ve made a few times!  Thank you very much, Martha Stewart!  I found the recipe here, but I’ll reprint it below for you.  Most recently, I served this with Aunt Trisha’s smashed potatoes (recipe here) and some watermelon…except I only made half of the parsley-garlic sauce because I find that if I make the whole batch, I have tons extra.  Easy, tasty — what more could you want?

Prep: 20 minutes
Total: 25 minutes
Serves 4

Steak Ingredients
1.5 lb flank steak (you could also use skirt or hangar steak cuts)
Coarse salt and ground pepper
1 TBSP olive oil

Parsley-Garlic Sauce Ingredients
1/4 cup olive oil
1 or 2 cloves garlic
1 bunch flat-leaf parsley, stemmed (about 4 cups) (this is pretty important — take the time to remove the stems from the parsley…if you leave them in, the sauce will taste too much like parsley)
3 TBSP oregano leaves
3 TBSP white wine vinegar

2 TBSP water
1/2 tsp salt

1/8 tsp red pepper flakes

Preparation:

1. (Step 1 is for the steak) Generously season both sides of flank steak with salt and pepper.  Heat 1 TBSP oil in a large skillet over medium-high heat.  Cook steak 5-8 minutes per side for medium-rare.  Transfer to a board; let rest, covered, 10 minutes.  Thinly slice against the grain.

2. (Step 2 is for the sauce) Meanwhile, make sauce: In a food processor, pulse garlic until finely chopped (I start with it chopped, so I skip this step and just pile everything in).  Add parsley, oregano, vinegar, pepper flakes, 1/4 c. olive oil, water and salt.  Pulse until herbs are finely chopped.  Serve with steak.

Posted in dinner, flank steak, garlic, oregano, parsley, parsley-garlic sauce, recipe, red pepper flakes, white wine vinegar | Leave a comment

>A Sneak Peak

>

A week or two ago at the Farmer’s Market, I bought two bunches of dahlias, one bunch a magenta/purple color and the other a red/orange color, and I put them in the same vase, on Gavin’s and my dining room table.  I kept on looking at them and so loved the colors that I decided to paint them because the colors on the petals reminded me of a watercolor painting!

Well, by the time I got around to drawing them, they were almost gone, so I drew as quickly as I could, even though the drawing itself took a long time to do because I wanted to be sure to draw most of the petals so that I could capture the look of the colors on the petals.  By the time I actually started painting, the flowers were dead, so I am thankful that I took a picture of them before they went kaput.

I have been working on this painting off and on for the last few days.  Today is the first day where it actually looks like I’ve made any progress at all — it took me a day or two to finish the main dahlia flower, and I only feel so-so about it right now.  Once I did the other pinky-purple flower, I liked the feel of that one much more.  But now that I’m starting to add some greens in with the stems and the flower buds, I think it is looking good and more cohesive and stuff.

I have this week off, so I’m hoping that I’ll have the time and motivation to finish it this week, so I can start on some paintings that I promised awhile ago as a gift!

Posted in dahlia, floral, flowers, painting, sneak peak, watercolor | Leave a comment

>You can think this is easy until you try it yourself

>

Me with the finished product.

About a month ago, I saw a brief article in the L.A. Times that was telling of a florist in Venice that was offering periodic floral design classes.  Thinking that it’d be something fun to do, and thinking that it might be a nice thing to take my sister-in-law Carrie to as a thank you for helping me so much with my wedding, I signed us up.  Carrie selected the “Modern Masterpieces” course.

The class was last night and, upon entering the design studio and seeing our project, I felt like we were being ripped off.  It looked easy.  Too easy.  I mean, it was just a bunch of leaves in one of those thin, straight, rectangular vases.  How wrong I was.

You can sort of see the
layers of the arrangement
from this angle.

After the demo, Carrie and I set off to making essentially what the teacher did.  First by sticking in some tea leaves to create a backing.  Relatively easy.  Check.  Then we had to stick in these flax leaves to create the backdrop for the orchids (I guess those green things are orchids…I did not know that).  Sticking in those flax leaves, believe it or not, was a little more difficult because they kept squirming around.

But, finally, I got the flax to stop squirming and then tried inserting the orchids.  This is when it turned out to be incredibly hard.  First of all, you sort of have to squash the orchids so that they can fit in the thin space of the vase, but they can’t look too squashed.  Furthermore, they’re very delicate (and easy to poke holes in, which I tended to do.  Third, they totally misaligned the flax leaves that I had worked so hard to make perfect.  So there was a good portion of the night where I was just trying to move everything slightly to get it perfect again.  I never did achieve that.

Carrie’s arrangement is on the left, mine on the right.

Neither did Carrie.  We started out with almost identical projects.  But she got so frustrated at one point that she totally scrapped that whole design and tried one of the other versions, where you take a palm frond and cut it so that it fit in the vase.  Then, she carefully floated orchids in the vase.  This type of arrangement seemed to be much easier and less complicated, but still had its problems.  However, I think we were both relatively surprised when we walked around at the end of class that our arrangements were average to above average compared to our classmates’, which was most definitely not expected after all of the troubles we encountered.

When I registered Carrie and I for the class, they said that if I bought 3, the classes would be slightly cheaper.  I had interest in many of their other classes, but most particularly in their holiday wreaths workshop being offered in November.  So, stay tuned for more floral designs to come!

Posted in class, design, flax, floral, orchid, venice | 3 Comments

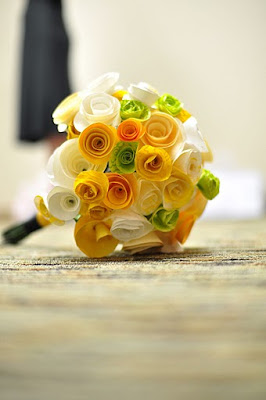
>Paper Flower Wedding Bouquets & Boutonnieres

>

If you’re going to get married and have the cost of the wedding be somewhat reasonable, the only way to do that now-a-days is to have a DIY wedding.  As Gavin and I planned for our wedding earlier this year, budget was most definitely an issue.  As we delved into getting quotes for various goods and services for the wedding, we couldn’t believe the extreme cost of some of these things.  I mean, we expected food and photography to be expensive, but were blown away with how expensive some things were — particularly flowers.  They are beautiful and everything, but they are literally dead when you buy them, and then you throw them away after the wedding.  Both Gavin and I thought that the cost was not worth it, so we worked on ideas around that.

Originally when I was thinking about how to save money on the flowers, I had the idea in my head to trade services — I would design a website for a floral designer in exchange for the florist’s help in putting together the bouquets.  Our conversation was going really well, until the florist I was working with never gave me an estimate for how much the actual flowers would cost and stopped contacting me.  Long story short, I guess she was on a reality TV show for a couple of weeks and apparently couldn’t contact anyone (though there were several weeks before and after she was on the show when, theoretically, she could have contacted me).  Guess how fun it was for me one month before the wedding when she re-contacted me, telling me that she’d get me an estimate for the flowers “soon.”  
So, obviously that florist was out.  In the couple months while I was waiting for the florist to contact me back, I began looking on various wedding blogs for reception ideas, and I ran into a post on Offbeat Bride about this woman who made her bouquet out of paper.  I saw that, and I thought it looked really cool.  But, at the time, I “had” a florist and a “plan” for flowers, so I thought no more about it.  Until I realized that the florist may never call or email again.  Then, not only did paper flowers look cool, they also felt like the best, most cost-effective, stable option.  
Carrie, my sister-in-law, helped me to find an internet tutorial, and off I went, starting small at first, seeing how feasible this option was.  I was nervous that everyone would think that they were super lame and that it would be obvious that we didn’t want to spend a gazillion dollars for flowers, but it turned out that the response I got from family and friends was very positive, which encouraged me to continue on in this quest.  
Soon after, I discovered that I really loved putting these paper flower bouquets together.  Sure, it takes a lot of time, and makes your living space look a little disheveled, but I soon discovered that the flowers were worth it.  And, by the time I knew it, I had put together one bouquet.  Only three more to go, which turned into 5, since Gavin’s sisters (who were groomspeople) decided that they would each rather have a bouquet instead of a boutonniere.  
A little daunting, considering I started this project a month or so before my wedding, but really it may have helped me to keep sane throughout the whole wedding process.  It was helpful for me to do something physical, with my hands, during a very, very stressful time of my life.  
And now, on the other side of the “big day,” I am really appreciative of the flowers, which were an additional takeaway for my bridesmaids and myself.  I don’t know what the others have done with their bouquets, but mine sits on Gavin’s desk in our office, in a vase and is a lovely remembrance of a really, really wonderful day.
I really miss putting together the paper flowers.  They were one of my most favorite things to do before the wedding, and now I have no occasion to make them.  However, it’d be neat if I were contacted by someone who either was at my wedding, or who knew someone who went to my wedding or whatever, and they commissioned me to put together bouquets for their wedding!  It definitely would be cheaper than going with a florist, at least in this part of the country.  Things like that sometimes happen!  
Posted in bouquet, flowers, paper, wedding | 2 Comments

>Lime-Vanilla Frozen Yogurt

>A few weeks ago I made some vanilla ice cream.  In order to do that, I had to buy a vanilla bean, which are incredibly expensive (anyone want to go in with me on a bulk order?).  The package I bought had two, and I only had to use one for the ice cream.  I saw that I had this Lime-Vanilla Frozen Yogurt recipe bookmarked from Epicurious, so I decided to make that last night before the extra vanilla bean I had went bad!

The result: I think it’s really, really yummy (and easy to make).  It’s not super sweet, since you use plain ice cream.  I like the slightly tart combination of the vanilla bean and lime together.  Gavin thinks it’s ok–turns out he thinks limes have a little too much flavor if you add them to things.

Here’s the recipe, with my commentary:

Two 32-oz containers of whole-milk plain yogurt
1 Vanilla bean
1 tsp finely grated fresh lime zest
6 TBSP fresh lime juice
1/2 c. light corn syrup
3/4 c. superfine granulated sugar

Preparation:

1.  In a cheesecloth-lines large sieve or colander set over a bowl, drain yogurt (covered and chilled, 12 hours).  Discard liquid in bowl.  I did this one container at a time (colander set over a bowl), with two different types of plain yogurt, because I happened to have two different types, Mountain High and Yoplait (did you know Yoplait did plain?  I did not know, either).  I found that the Mountain High took forever to separate, because it kept on draining liquid.  The Yoplait barely drained anything–the consistencies were totally different!

2.  With a knife, halve vanilla bean lengthwise and scrape out seeds (discard pod).  In a blender, puree together vanilla seeds, half of drained yogurt (this was easy for me, since I kept my two yogurts separate), lime zest, lime juice (I only used 5.5 TBSP, since I didn’t want to cut open a whole new lime), light corn syrup (one of the commenters said she used simple syrup, which worked) and superfine granulated sugar (I just used plain white granulated sugar and it worked just fine).

3. In a large bowl, stir together blended vanilla mixture and remaining yogurt.

4. Transfer mixture to an ice-cream maker and freeze.  Transfer frozen yogurt to an airtight container and put in the freezer to harden.

Posted in dessert, frozen yogurt, ice cream, lime, recipe, vanilla | Leave a comment

Inaugural Post

After many, many years of blogging, I discovered on my old blog that I neither had the time nor the energy to keep up posting regularly about my life.  However, I have really fond memories of blogging and, although I think I could eventually resume blogging in that way, right now I find myself in need for a new type of blog, a blog that specifically catalogues things that I make.

I make a lot of things.  I really love to create, whether it’s a new painting, design, meal–whatever it is, I really enjoy putting things together and watching them turn out.  I also desire to share my creations with others.  So, this blog will act as a catch-all for the various things that I create.  Hopefully you’ll not only enjoy looking at what I’ve created, but also be inspired to create for yourself!

Posted in Uncategorized | 4 Comments