>Meyer Lemon Sorbet

>I just have to share this recipe with you.  I found it here, on the Pioneer Woman’s Tasty Kitchen blog.  The person who uploads the recipe says it’s a “delightful blend of lemon and orange with just the right amount of sweetness and tartness,” which I think is funny because the recipe doesn’t have any orange in it at all.  It does, however use Meyer Lemons, which are sweeter than typical lemons, so this sorbet does really have a wonderful balance of sweet and tart.  This sorbet is also great because it has a nice creamy flavor, without adding any dairy!

Prep: 15 minutes (plus chilling time of a few hours to overnight–your choice)
Total: 35 minutes
Serves: I think it makes about a quart

Ingredients
1-3/4 cups sugar
2 cups water
1 egg white
3/4 cup fresh meyer lemon juice
2 teaspoons freshly grated meyer lemon zest
4 teaspoons vodka

Preparation

1. Zest lemon and set aside.  Juice lemons and set aside.

2. Combine sugar and water in a small saucepan and place over low heat.  Stir until sugar dissolves.  Raise the heat and boil for 1 minute.  Remove from heat.

3. While you are dissolving the sugar/water mixture, in a large bowl, lightly beat the egg white until foamy.  Slowly beat in the hot simple syrup created from step 2.  Continue to beat until the mixture cools down slightly.  Add the meyer lemon juice.

4. Cover and chill until cold or overnight.  The mixture will have the egg white foam on top, but it will mix in when placed in the ice cream freezer.

5. Once the mixture is cold, churn the mixture in an ice cream mixer.  Mix in the zest and the vodka and freeze until it is the consistency of a soft-serve custard (~25 minutes).  Remove from the ice cream mixer and place in a container appropriate for freezing.

Posted in dessert, egg white, ice cream, lemon, lemon zest, recipe, sorbet, sugar, vodka | 2 Comments

>A very tasty salad: Jamie’s Cranberry Spinach Salad

>With the record-breaking heat, I most certainly did not want to cook something for dinner tonight.  Since we had a half-bag of spinach left over from a soup recipe I made late last week, I decided to make some sort of spinach salad.

The spinach salads I had bookmarked to try didn’t really inspire me, so I googled spinach salad and found this recipe (the bonus was that I didn’t even have to go shopping–had almost everything at home!).  Since the recipe serves 8, I used AllRecipe’s handy calculator to turn it into 2 servings (which I’ve posted below).  I also added chicken to make it a main course salad. Gavin, who rates all salads as 3/5, said that this salad was “at least a 4,” which really shocked me!

Below is my take on the salad (added chicken, omitted poppy seeds, a little extra onion).

Jamie’s Cranberry Spinach Salad

Prep time: 10 minutes
Total time: 20 minutes
Serves 2

Ingredients:
3/4 tsp butter (I eyeballed this)
3 TBSP slivered almonds
1 boneless chicken breast
salt & pepper
1/2 bag baby spinach
1/2 c. dried cranberries (I threw in a little more…maybe 2/3 or 3/4 cup, but this is not necessary)
1-1/2 tsp toasted sesame seeds
2 TBSP white sugar
1/2 tsp minced onion (I eyeballed this and my guess was that it was more like 1 tsp, and it was just fine…not too oniony)
1/8 tsp paprika
1 TBSP white wine vinegar
1 TBSP cider vinegar
2 TBSP canola oil

Preparation:

1. In a skillet, melt the butter over medium heat.  Cook and stir the almonds in butter until lightly toasted. Remove from heat and let cool.

2. Salt and pepper the chicken breast on both sides.  In the same pan the almonds were cooked in, cook the chicken breast. (I find cooking an average boneless chicken breast for 6 minutes per side gets me perfect results: safely cooked, but still juicy.)

3. In a large bowl, combine the spinach with the toasted almonds and cranberries.

4. In a smaller skillet, toast the sesame seeds.  (If I were smart and had read the recipe closely from the beginning, I would have, in the same skillet, first toasted the sesame seeds, then melted the butter, toasted the almonds and then cooked the chicken.  Hopefully if you’re smart and reading this carefully before you begin, you will save yourself from washing 1 extra skillet!)

5. In a small bowl, whisk together the sesame seeds, sugar, onion, paprika, white wine vinegar, cider vinegar, and canola oil.  Toss with spinach just before serving.

Posted in almonds, chicken, cranberries, dinner, onion, recipe, salad, sesame seeds, spinach | Leave a comment

>Watercolor Class: Day 2 & 3

>Well, as many of you are aware, I did not post my watercolor painting from my class last week.  This is because I was in class long enough only to draw the still life — I had to leave early to attend a luncheon for the nonprofit of which I am president.  So, this week I worked on the painting from a photo I took before I left class.

The finished painting is to the right.  On a side note, I recently bought a new all-in-one printer/scanner/copier that does larger format scans.  My initial scans were positive, but then I noticed that the colors were slightly off and in this painting I can definitely tell that the scan quality is poor.  In this painting, I discovered that the scanner cannot pick up on light colors, so the scan looks really washed out, and is more yellow than it should be.  The background looks like it’s pure yellow — in actuality, the painting background is a mixture of yellows and orange.  So–this is disappointing.  I am going to return the printer and think about buying a (very expensive) large format scanner that can capture these colors more accurately.

Anyway, when I was painting the succulent throughout the week, I thought that the painting was ok (although the leaf up front really needs some work…not satisfied with it, really), but too cool.  I think the yellows and orange in the background really warm up the painting and help bring out the yellow and orange details that I put in the succulent.

In today’s class, the teacher displayed a really neat, massive purply-pink succulent nested in a straw hat.  I really enjoyed drawing the various curly/pointy leaves and then had a lot of fun laying down the various colors.  I didn’t fully finish the painting, but have laid down the colors so far.  Now my plan will be to create the detail needed to make the painting pop.  The painting is to the right–I will update once I finish the detailing.  I’m really undecided so far whether to add another background beyond the hat–it might be too much, but then again, it might add a little something.

Website update:
I’ve finished a few more sections of my new website, but added a few more sections to fill-out, as well!  It’s madness!!  The website is here (http://jsgreene.com/new) and the finalized sections within the design section are the last five sections: flyers, invitations, logos, posters and websites.  I just noticed a broken link in the flyers section, which I will fix, but if you notice anything that needs to be addressed, please let me know!

Also, good news–my cousin, who hosts my website, says that he can make my blog hosted on my website, so once my website is finished, then I will work on transferring over my blog, which means that I’ll be able to fix the blog design to be easier to read!

Posted in class, painting, succulent, update, watercolor, website | Leave a comment

>Where have I been??

>Where have I been?  Well, I’ve been working on updating my website.  I am finding that it is taking awhile because I am trying things that are newer to me…expanding my skills a little.  So, I am learning and trying and fiddling with things to try to make them right.

One of the things I’m trying is using this one site called Typekit to import specialized fonts into my website.  For those of you who don’t know, when designing websites, fonts are really tricky because each computer has their own set of fonts, that other computers may not have.  So designers typically use a handful of fonts that happen to be on every computer, Mac and PC.  It is very limiting.  I found out about this Typekit place, and basically they can imbed specific fonts on your website…for a price.  I thought that I’d try that out, but it’s been difficult because when I build the website, I can’t see what it looks like…I have to upload it and make it live in order to see how the fonts are working.  It’s a lot of work, a lot of back and forth.

Anyway, it is more slow-going than I’d like it to be, but it’s a challenge.  You can take a sneak peak at my new website by clicking here.  Right now, only the home page, the design page, and the website pages work.  Everything else will be a blank page or a file not found.  If you have any thoughts or suggestions, I’d love to hear them — leave it in the comments.

You may also be wondering — where is my watercolor painting for this week?  The answer is unfinished.  I had to leave class early on Monday to go to something and could only sketch the demo and take a picture.  I have since come home and done a fair amount of work on the painting (maybe 2/3 or 3/4 done), but haven’t had time to finish it.  I’d post a pic of it, but Gavin took his camera to work, I think.  You’ll have to wait.

Posted in design, watercolor, website | 6 Comments

>A big difference in a little time

>

Returning from an afternoon out, I came home to find an email from one of my clients in my inbox.  As an aside, I really like all of my customers — one of the benefits of doing freelance is choosing who you work with!  Anyway, I got an email from him asking if I had time to suggest a few quick tweaks to a flyer that they had drafted up for an upcoming seminar they are hosting.  I opened it up and saw the flyer (to the right) and thought, “Where do I even begin?”  Here I thought I was just going to give a few suggestions (like I did earlier in the week when they needed some suggestions for a simple flyer they were making), but I felt that the flyer needed a complete redesign.  How dull does this look?  Furthermore, are you supposed to be looking at the top half or the bottom half?

So, I sent a quick email back, getting more information about how the flyer will be used, and where it’ll go.  My client explained that he needed it to go out ASAP and that it needed to be done in Word and also had to be emailed out to their email list.  So, I took a half hour before dinner and totally redesigned the flyer.

I am really happy with how it came out.  It looks professional, the color matches the official color of the company, the important, factual bits about the seminar pop out, but still remain a cohesive whole within the document.

I am not an accountant and the seminar seems way over my head, so I am likely not the target audience, but I think I’d be more likely to attend (or at least consider attending) the seminar from my flyer, as compared to what they would have sent out. I am glad that my client emailed for help–for what took me a half hour, they were probably working a good portion of the day on.  Now it looks better and hopefully will draw people to them, because they really do seem like they’re a great company with a lot to offer, from my experience working with them.

Posted in accounting, before and after, client, design, flyer, microsoft word, seminar | Leave a comment

>Watercolor Class: Day 1

>Today was my first day of school in a few years. As I mentioned in a previous post, I have decided to take a watercolor class through my local creative arts center for the next 8 weeks or so just so that I am being intentional about painting regularly.  On Saturday, when I was gathering my supplies to prepare for the class, I knew I needed to stop by the art store and buy some paper, since I only had a sheet or two left.  Gavin and I dropped by after a morning of errands and discovered that Swains (my local art store) was having their annual 20% off of everything in the store sale.  I find it particularly annoying when they offer this sale because, literally, there is a line of hundreds of people that wraps around the store just to buy stuff. Needless to say, Gavin and I did not stay to buy paper and today I made do with what I had (which is quite different in feel from what I typically use)!

So, this morning I headed out to the class, which is just minutes away.  I arrived between 5-10 minutes before class started and found that I was the first to show up, other than the teacher.  The teacher (get this) is 93 years old, next month.  I couldn’t believe it when she told me — she looks at least 10 years younger.  Anyway, it seems that this is a class that a few regulars take.  I discovered this because I was told to “sit anywhere” and, when I did and people slowly entered (most 20 minutes late!), they were told, “Jennifer is sitting in your spot today, so you’ll have to sit somewhere else.”  Not exactly that welcoming, but most of the members of the class are very retired, so I suppose when you get to be that age, change is a little more difficult to deal with?  
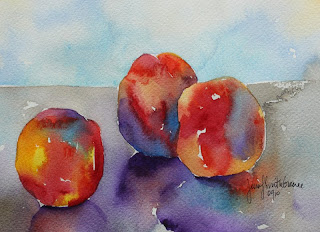
Anyway, the teacher waited for the class to show up, so the class didn’t really start until just before 10 a.m. There was a still life set up of some nectarines on this black mirrored plate (so that we could practice reflection) and I could have started in, but I wasn’t sure if the instructor was going to start out with a demo or something.  That’s how a previous class I took went — the instructor did a demo, then the class painted.  That was an excellent class and I’d be taking it again, except that it’s much more expensive and being taught by a different person.  So, I waited along with the teacher and was really disappointed that once the class got there we all could start…no demo or anything.  If I would have known that, I would have started immediately.  
When I got to painting, I did a quick line drawing of the still life, then set out painting.  I was excited to do the nectarines because I love laying down the strong yellows and reds and having them mix on the page.  I had a little bit of difficulty with the black, reflective surface, but I think it came out ok. And when I went to place in the detail in the painting, I discovered that there wasn’t really any detail for me to do…so I left it very rough-looking and fluid.  This is, in a sense, what I wanted to practice on–lately I have felt that I get too tight when I do my paintings.  
As I finished and looked around, I realized that I may already be much more advanced in skill than my fellow students — I was a little shocked to know that this was the “intermediate” watercolor class.  I also looked at the clock and was amazed that I had finished the painting (which is on the larger side for me, at around 12″ wide and 10″ tall or so) in about an hour and I still had another hour to go in the class.  So, I used one of my smaller scraps of paper that I had to do a smaller composition of the nectarines.
I finished that one in about a half hour and called it a day.  Later on this afternoon I went and got some more paper, so I should be set for the next few weeks.  Hopefully I’ll have some nice things to post up on here for you all to see over the weeks, and it’d be extra super neat if you will also be able to see an improvement in my painting (or not!).  
Posted in class, nectarines, painting, still life, watercolor | 3 Comments

>Design: Car Insurance Flyer

>A friend of mine recently contacted me to create a flyer for her new side business of selling car insurance.  She needed a small flyer to be able to hand out to people as a promotional piece, to let them know of the services she offers and the discounts she can make.

Traditionally, the design for these types of flyers is colorful and noisy.  There’s typically a lot going on and the eye does not rest easily on the page.  One of the sample flyers she sent me is to the right.  The colors are simple, but bolder.  The design is messy–the eye does not know where to go, what to look at.

My friend gave me the basic layout of her own flyer that she created in Photoshop. Like the standard ads, she wanted bright, bold color and a fancy car to grab attention.  She wanted to offer coupons and make sure to include all of the relevant points that might attract customers.

What I wanted to do was to make the design cleaner and more attractive.  I wanted her potential customers to be able to glance at the flyer and know what it is that she is offering.  To do this, I used the bright colors only on the important concept points of the flyer: the title, the phone number and the coupons/discounts that she could offer.  I also made use of size variations of fonts, to help direct the viewer’s eye, so that not everything has the same weight and importance.  This is a lot of information in a little space (5.5″x4.25″, or 1/4 of a sheet of paper), and so as a designer, I have to help prioritize for the viewer the eye-catching, important, big-picture concepts.

What was a new learning curve for me was that I had to take this same flyer that I created in English and re-create it in Spanish.  My friend wanted one side to be English and the other side to be Spanish, because she is trying to build a bilingual insurance business.  At the beginning of this project, I thought that would be an easy step, but I learned that it can actually be a design challenge.  The design I had created worked really well with English words, but when translated into Spanish, I needed to make choices about how to display the information when some of the words and phrases were either much longer or much shorter than the English wording.  For instance, in the red starburst, the $0 down works really well as a unit.  Seems balanced in the space.  But if I were to do that exact same placement of words in the Spanish version, it would throw the whole starburst out of shape.  Likewise, with the coupons, I had to widen the shape of the coupon and adjust the wording placement so that it would fit and not look funky.

All in all, both my friend and I are really pleased with how the flyer turned out.  And it was great experience for me to be able to figure out how to do the same design and create the same look and feel, but with different wording content.

Posted in before and after, bilingual, car insurance, design, flyer, postcard | 3 Comments

>Moroccan Chicken with Fruit and Olive Topping

>In going through my bookmarked recipes that I’ve recently made but haven’t filed, I found this recipe that I thought I’d share.  Both Gavin and I found it to be very tasty!  And since it’s a Cooking Light recipe, I guess it’s also better for you!  (Recipe taken from here)

Prep time: about 15 minutes
Total time: about a half hour
Serves 4
Ingredients
1 TBSP olive oil, divided
1/2 tsp salt (I use Diamond Kosher Salt, which I love)
1/4 tsp black pepper (I eyeballed this with a pepper mill)
1/4 tsp dried thyme
4 skinless, boneless chicken breasts
1/2 c. onion, chopped
2 tsp bottled, minced garlic
3/4 c. dried mixed fruit (Gavin and I have a lot of dried fruit in our pantry.  When I made this, I used a combination of: apricots, cherries, white peaches and prunes)
1/2 c. dry white wine
1/2 c. chicken broth
1/4 c. chopped pitted green olives (I used some with pimentos in the olives and didn’t bother removing the pimentos)
1/8 tsp salt
1/8 tsp black pepper
Preparation
1. Heat 2 tsp oil in a large nonstick skillet over medium-high heat.  Sprinkle 1/2 tsp salt, 1/4 tsp pepper and thyme evenly over chicken (I didn’t bother measuring out–just eyeballed it).  Add chicken to the pan; cook 4 minutes on each side, or until done.  Remove from pan; cover and keep warm.
2. Heat remaining 1 tsp oil in pan (use the same pan you cooked the chicken in).  Add onion to pan; sauté 2 minutes until tender.  Add garlic to pan; sauté 30 seconds.  Add fruit and remaining ingredients to pan; cook 5 minutes or until liquid almost evaporates.
3. Place chicken on plate or in bowl and spoon the fruit mixture over the chicken.  (I can’t remember what I served this with, but it would go nicely with rice, quinoa, or couscous.)

Posted in chicken, chicken broth, cooking light, dinner, dried fruit, garlic, green olives, moroccan, onion, recipe, white wine vinegar | Leave a comment

>Emotional Peace

Art’s purpose is to sober and quiet the mind so that it is in accord with what happens.
~John Cage

A friend of mine from seminary, Laurie, sent me this quote a few days ago through email.  Laurie had said that the quote reminded her of me.  And when she sent it, I was in the midst of a huge emotional turmoil, which I don’t think she knew.  Work was really stressful and hard and the nonprofit I help to run was really stressful and hard and it seemed like there was not much time for art, not much time for peace.

Now that I feel myself working out of that stressful and hard few weeks, I am really able to contemplate and comprehend the quote by John Cage for how it speaks to me.  What I take away from the quote is that really and truly for me, the practice of doing art or design or crafts is helpful to help calm my spirit.  Art helps me to slow down, to contemplate little details that make a big impact on the whole.  And yet, when I am in the midst emotional turmoil, the last thing I want to do–create art–is perhaps the thing that will speak most to my spirit, help center me and give me the perspective I need to help find my way through difficult and stressful times.

It reminds me a bit about exercise.  I love to play sports, but do not love so much to do calisthenics or aerobics or things on that order.  Like sit-ups.  I hate, hate, hate sit-ups.  For one, I think they’re totally boring.  I know they are good for me and all, but they really don’t keep my attention and they are not fun to do.  Over the years I have noticed that various athletic instructors have told me to remember to keep breathing when I do sit-ups.  And on the surface, that seems like such a dumb comment…until I realized that I do hold my breath when I do sit-ups.  For whatever reason, my body is so negatively responsive to doing sit-ups that it sabotages itself from doing them properly.  And I do notice that when I am consciously willing myself to breathe during those moments doing sit-ups, the sit-ups are remarkably easier and more pleasant.

I guess what I want to say is that art is an important, integral portion of living my life well.  It is what helps me to breathe and to bring me some peace when life gets hard.  I am currently trying to restructure my life such that I will have more opportunity to be mindful of art’s place in my days.  As one example, I have signed up for a weekly watercolor painting class at a local community arts center.  This is not as much to learn technique, although I assume that I will learn while in the class, but more-so to be really intentional at making space in my week to be doing the (art) work that I want to do.

Posted in art, peace, quote, thoughts | 2 Comments

>Dahlias

>

I finished this painting last week, but am only now getting around to posting it.

This painting was inspired by a bouquet of dahlias I bought from the Farmer’s Market in Burbank.  They were so vibrant and their petals reminded me of a watercolor painting, so I thought that I’d try it out.

The painting took a long time to draw the basic outline and to paint the first flower, but then it flowed together more easily after that.  Painting wise, I started first with the main flower, then painted the other magenta flowers, then I moved onto the red-orange flowers and painted all of those, then I painted all of the green stuff: the stems, leaves, etc.

I am really happy with how the vase turned out.  The vase I had the arrangement in is quite funky, so while I was painting it, I wasn’t sure if I would be able to capture the vase well enough so that the viewer  would understand the shape of the vase holding the arrangement.

Anyway, glad that the painting is finished (can have the dining room table back!), but the process reminded me that I am really out of shape when it comes to painting.  Sure, I can sit down and paint a relatively nice painting, but without the regular practice, my technique just looks too forced to me…not enough flow.  I’ve decided that in the desire to get back into shape, I will take a local watercolor class to make myself practice painting weekly.  I still have to sign up, but the class should start in the middle of September.

Posted in dahlia, floral, flowers, watercolor | 6 Comments